|
Self
Take Photography for carp fishing
– By Steve Noctor
|
............................................................................................................
It appears to be becoming a
growing part of our hobby to have a camera thrust in our direction by a
successful angler. Usually that’s not a problem if we are in the next
swim but there are times when it’s not possible or practical. Sometimes
we find ourselves alone desiring a trophy shot. Even when not alone
asking a fellow angler can unwittingly ruining their chances of a fish.
At main feeding times I don’t mind being disturbed for something
exceptional but I do feel a bit put out for run of the mill fish. On
such occasions I often wonder why many people rely on others rather than
taking their own trophy shots.
I have fished alone for many
years. At first this situation left me relying on complete strangers to
take my photographs. Some results were good, some were bad and others
were downright atrocious. I decided I needed to learn how to take my own
pictures in order to reduce the disappointments. At least I’d have no
one else to blame other than myself for poor results. I’m no
professional photographer, just your average carp angler who likes an
odd picture of some of his catches. Through trial and error I have
learnt how to take decent photographs of myself and my fish. I do make
the occasional mistake but I am confident enough to refuse the
assistance of strangers when I have doubts about their ability to use a
camera in preference to self take photography.
When I first
started doing self takes the affordable cameras available were not
really suitable for fishing purposes. Everything on my first camera was
manual. I had to manually focus it, take a light reading while taking
into account the film speed I was using before calculating the best
shutter speed and aperture settings. Even worse, I had to manually wind
the film on after each photograph was taken and rewind the ten second
timer too. This involved putting the fish down between pictures which
made the process time consuming and left the fish in more danger of self
harm. I would then press the shutter release and dash back to the fish,
pick it up, get it under control and then pose for the next trophy shot.
As you can imagine, the fish didn't always play the game and I have a
collection of photographs and slides of me wrestling carp while pulling
some amazing faces. Fortunately things have progressed a lot since those
early days and quality cameras can be bought at reasonable prices today.
Even if you are on a tight budget, the second hand market has some real
gems at affordable prices and today's digital cameras make self take
photography almost fool proof.
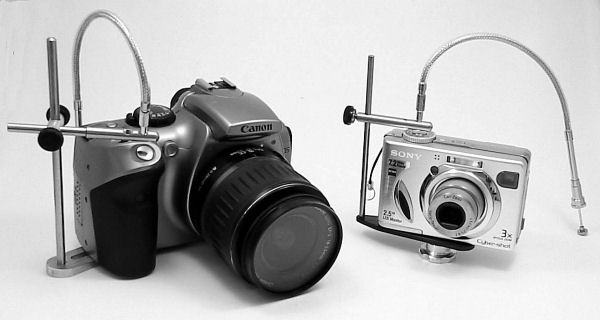
The equipment I use today consists
of a digital camera with a built in flash, a light weight adjustable
tripod and an air release. Everything except the tripod fits into a
camera bag. The tripod goes in my tackle bag and takes up little extra
room. The camera I use is a world apart from my first. It can be turned
on and set so that everything is done for me. It reads the light
conditions before selecting the shutter speed and aperture settings and
tells me when I need to use a flash. It also focuses itself and
automatically winds the film on after each shot. You could say that it
is idiot proof but it isn’t. I know, I’ve been that idiot using it at
times but I do learn from my mistakes. I use an air release instead of a
remote control because it allows me two totally free hands to hold the
fish. I often see shots of people holding their remote between the index
finger and thumb of one hand while the other three fingers support one
end of the fish. It looks like an accident waiting to happen if the fish
misbehaves. If my camera only had a remote option I would make something
to operate the remote by kneeling on it. My own camera isn’t designed
for an air release but I made a couple of brackets so that I could use
one with it and I believe you can buy purpose made adaptors and straps
that will fit most of today's cameras.

When I’m alone and catch
something that I want to photograph, the first thing I do is secure the
fish. I’ll leave it in the landing net where possible or sack it if
necessary when the rules permit. With the fish safely retained I can
start the process of setting up my camera. Although I do like to see my
fish returned as quickly as possible I feel that it is better not to
rush this procedure because haste often leads to mistakes.
There
are things to consider before getting the camera out. They can make the
difference between a good shot and a poor one. The first is light. This
is probably the main cause of most people’s photography failures,
whether self take or not. In daylight I want to be facing the best light
source available. Some days it is blatantly obvious where that is coming
from. A clear sky and a bright sun is an easy one but on dull overcast
days it can be more difficult to define. Sometimes, the difference
between the strongest light and the rest is negligible. When this occurs
in low light conditions I find it best to set my camera to operate the
flash in order to boost the light. Lots of today's cameras will tell you
when the light is poor and the flash is required. Obviously, if I catch
a fish at night, the light available will be insignificant and I’ll have
to use the flash as the sole light source for the shot.
The
background can have a bearing on the outcome of a photograph. A lake can
make a superb background when the conditions are right but it can also
be the worst when conditions aren’t suitable. Water is a good reflector
of light and in low light conditions the lake can often be the best
light source. Using the lake in these circumstances can make you look
like a silhouette because you will be under exposed. I’ve made that
mistake in the past and have seen countless examples of other anglers
doing the same. For that reason I rarely use the lake for a background
apart from in very good light conditions. I prefer reed beds, bushes and
dense undergrowth but if nothing suitable is available I’ll use my
shelter. At night or in poor light with the assistance of the flash a
dense reed bed, a bush or the back of a bivvy can help define the out
line of the fish.
Once I’ve decided where I’ll take my pictures
I’ll proceed with setting up my equipment. First I’ll position my
unhooking mat where I intend to pose. Once the camera has been attached
to the tripod I will position it facing the mat with the best light
coming from behind the camera. The distance of the camera from the
subject (me and the fish) is important. Too far away and I’ll look small
in the photograph. Too close and I’ll loose part of the subject. In
order to define the correct distance I stick a storm rod into the ground
tight to the back edge of the mat and in line with its centre. I kneel
behind the storm rod in my posing position and adjust it’s height to
just above my head. By looking through the viewfinder I can now use the
top of the storm rod and the edges of the mat to frame my shot. I do
this by moving my camera closer or further away from the mat. Some
cameras have a zoom lens fitted and it is easy to be tempted to leave
the camera where it is and zoom in on the subject but this can be a
mistake. Cameras fitted with a zoom lens need to be set so that the lens
is set at 50mm. This I understand makes the camera see the same as a
human eye and allows the camera to be close to the fish which helps the
photographs a lot. I find that if I zoom in to frame a shot rather than
move the camera closer the picture quality isn’t as good. Also, when
using the flash, the camera can be too far away from the subject to get
sufficient light on it.
Once I have the camera at the correct
distance I adjust the tripod legs to get the camera at the height of
someone kneeling down. This gives me a full on shot of the subject
rather than an angled shot looking up or down at it. The storm rod is
removed once the shot has been framed. I position my air release bulb
where my right knee will be before feeding the pipe under the mat and
back to my camera and attaching it. A container of water is placed just
out of frame to one side of the mat for wetting the fish. The camera is
turned on and set to the conditions of the day. I usually set it to auto
but on a day with good light I will use the natural daylight function
instead. If you know your camera well you can pick whichever function
you feel best suits the conditions. I will now take some test photos by
posing without the fish. In particular the operation of the air release
needs to be smooth and effortless. If it takes too much effort to
operate, you can end up moving during the shot causing the finished
photograph to be out of focus. Common causes are kinks in the pipe or
the ground being too soft under the bulb. Kinks are easily cured and a
bucket lid or two will make a solid base for the bulb. If I think that
the camera is either too far away or too close I can reposition it until
I am happy. Also if the photograph isn't quite right and the camera
settings need altering I can do so at my leisure. It is always better to
have everything set up before the fish is removed from the water
so I will repeat the test shots until I am
happy with them . The
last thing I want to do is start messing with the camera settings while
the fish is on my mat. If you are new to self takes a bit of practice
will stand you in good stead and help the process run smoothly when you
have a fish ready to photograph.
With everything tested and set
as desired I wet my unhooking mat before removing the fish from the
water and placing it on the mat. I wet the fish down and remove any weed
or detritus before picking the fish up ready for the first pose. I keep
looking out for the tell tale signs that fish is going to struggle. As
soon as I think it is I replace it on the mat and try to calm it down.
If the fish starts flapping I cover its head with my wet carp sack or
weighing sling which usually helps to calm it down. Once calm I will
pour more water on the fish before trying to pick it up again. Once I
have the fish held ready for the first shot I gently kneel on the air
release bulb but not fully depressing it. The camera bleeps once when it
has focused itself and is ready to take a photograph. As soon as I hear
the bleep I fully depress the air release bulb and take my first shot.
The procedure is repeated as often as required if I want more than one
picture of that side of the fish. When I want to photograph the other
side I put the fish back on the mat and turn it over taking care to make
sure its fins are not twisted or squashed during the process. I water
the fish again before picking it up and photographing the second side,
which is simply a repeat procedure of the first.
Before returning
the fish I secure it in my unhooking mat and water it again. My mat has
a top to it that velcros closed so that the fish can't harm itself if it
does begin to flap. After making sure that the carp is relatively happy
I have a quick look at the photographs on the back of my camera. All
that I am looking for is that the fish is entirely in the frame and that
it is in focus. If I have done my preparations right, which is usually
the case, everything will be fine. This check will take me less than a
minute and if all is well I can immediately return the fish. Even though
I prefer not to, if I have made a mistake, I can retake the photos but
this is very rare. I never retake photos because I have too much
background, preferring to crop the ones I have taken instead. If I do
feel the need to retake any shots I always make sure that the fish
remains wet at all times and in a happy condition. One thing to bear in
mind here is that the photograph isn’t the most important part of carp
angling. Looking after our catch and ensuring its safe return is very
important. If something goes wrong with my equipment during a trophy
shot I will return the fish to the lake to ensure it is there for others
to catch tomorrow. On a similar note, the whole process of self takes
can sound rather time consuming but in reality it only takes a few
minutes to carry out the preparation. The time it takes to do the
photographs is only the same as when someone else takes them for us. I
mentioned this earlier but feel that it is worth repeating, practice
makes perfect and with a little practice it doesn’t take long to become
competent. Take pictures while posing with buckets, bags, hats or
whatever and it will pay you back in the long run and will negate the
need for other anglers to wind their rods in at what is obviously bite
time. However, if the fish is special and I'm on your water at the time,
give me a shout and I'll quickly be around to do the honours. Be lucky.
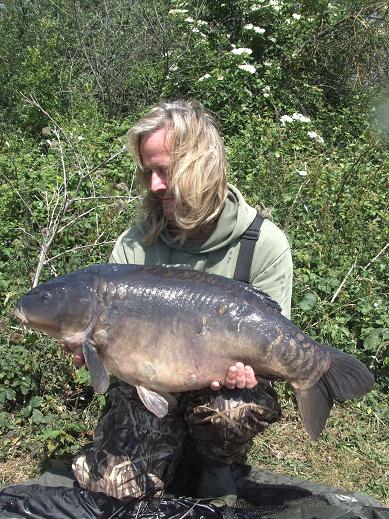
The end result - a
quality self take of a 30 plus English carp!
............................................................................................................
|